Abstract
The GyDB Package is the downloadable version of our project online the Gypsy Database (GyDB) of mobile genetic elements. This package allows for deployment of a local version of the GyDB, making it possible to create your own personal database using the GyDB framework for your intranet. The package includes all the functions available on the online version of the GyDB, consisting in content and literature browsers and services, except the BLAST and HMMER programs and the images of which we are not owners. Accession to BLAST and HMM servers can be compiled and executed on local machines and the services directly link by default to the GyDB online. If you want to implement these two programs or any other tool in your own database, the package facilitates content creation and management with examples and automations.
Availability
Available online February 1, 2008. The GyDB Package is distributed at Biotechvana Bioinformatics under the dual terms of the COMMON PUBLIC LICENSE (URL 1) and the agreement for software and database tools in open source (URL 2).
Introduction
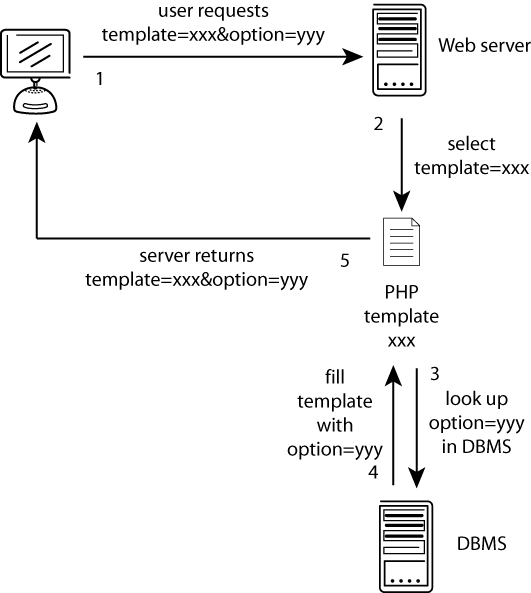
The GyDB Package provides the framework, including source code and examples, required to create your own personal database based on The Gypsy Database (GyDB) of Mobile Genetic Elements (1). This version is based on the phylogenetic analysis of Ty3/Gypsy and Retroviridae LTR retroelements (2;3) and related non viral proteins. The package consists in a complete set of templates, scripts, and utilities written in PHP scripting language, and a MySQL database backend that allows you to build your own personal local intranet or Internet version of the GyDB with your own contents. The PHP template set defines the layout and the appearance of the document, creating dynamic web pages filled with the data contents retrieved from the MySQL Database Management System (DBMS) based on the user?s request; contents and presentation are managed separately. The communication process is graphically detailed in Figure 1. Although this package may be installed on any of the most common operating systems, we recommend installing it on a GNU/Linux operating system; we have successfully tested it on this configuration. All services offered in the online version of the GyDB are available in this package except the BLAST and HMM servers that directly link by default to the GyDB online. However, if you would like to implement these servers as two searches in your own database, you may refer to the instructions and citations provided in this paper for installation on Linux platforms.
Overview
Database management:
We recommend reading the phpMyAdmin documentation available at (URL 3) to know how to perform the basic operations. Here are listed the most common operations needed to manage database contents:
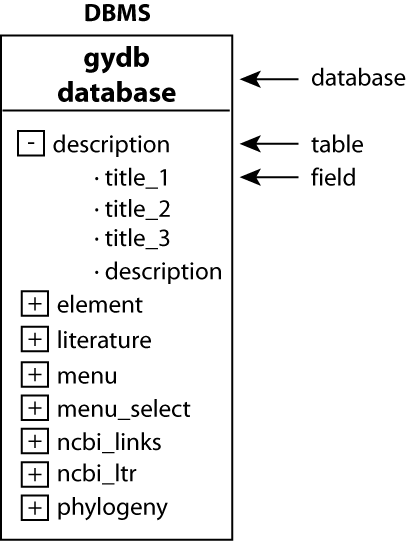
a) Database structure. A DBMS can contain several databases. Each database contains tables and each table contains fields. In this case, our DBMS is a MySQL database engine that contains a database named ?gydb_gydb?, which contains a set of tables containing a set of fields. The database structure is shown in Figure 2.
b) Create a database. Open phpMyAdmin. On the main page insert the new database name in the textbox. Then click on the button ?Create?.
c) Select a database. Click on the drop-down list named ?Database?, located at the top left of the page, to see a list of the available database names. Then click on the database name to open it.
d) Drop a database. Select the database to drop from the list of the left frame. Click on the ?Drop? button. Then, click ?Yes? in the confirmation dialog.
e) Select a table. First, select a database; all tables contained in that database will be shown below. Then, just click on the table you would like to edit.
f) Browse a table. Click on the table icon at the left of the table name in the left frame of phpMyAdmin.
g) Organize rows alphabetically by a field. When browsing a table, click on the name of the column to organize rows alphabetically by this field.
h) Search a row. Once the table is selected, click on the ?Browse? button; you will see listed all rows of a table. Optionally, the rows can be alphabetically organized by any field, by clicking on the field?s name.
i) Insert a row. Open a table and click on ?Insert?. Then fill in all the required fields and click on ?Go?.
j) Edit a row. Once you have found the row you would like to edit, click on the pencil icon.
k) Delete a row. Once you have found the row you would like to delete, click on the Red Cross icon.
Creating users in PhpMyAdmin
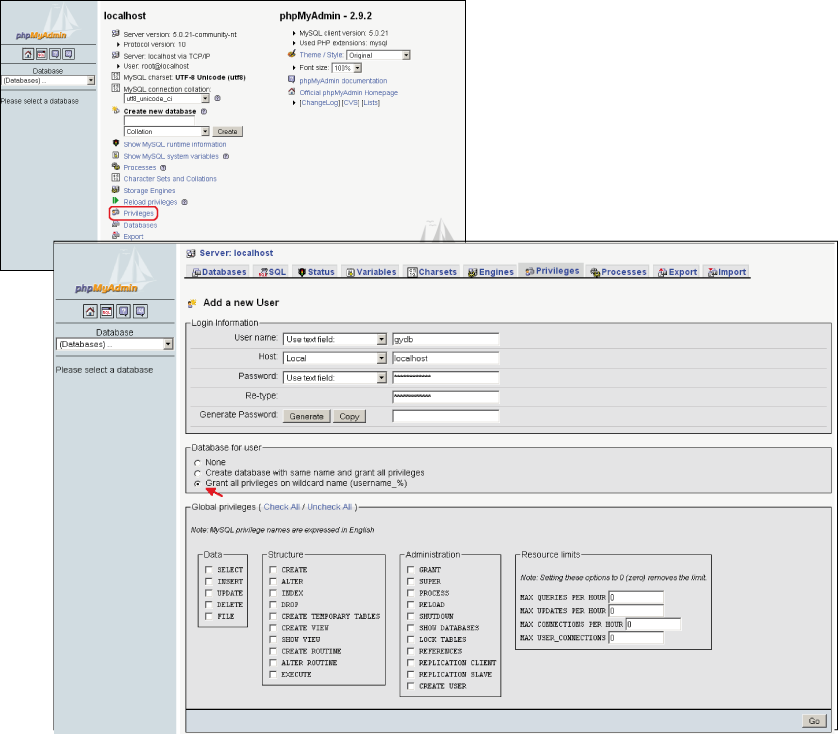
As shown in Figure 3, on the main page select ?Privileges? and then click on ?Add a new User?. In ?login information? set the user name as ?username? (user name will be replaced by your user name), in ?host? select ?Local?, and in ?password type? select ?username?. It is very important to check the ?Grant all privileges on wildcard name (username_%)? option. Do not check any of the ?Global privileges?, and finally, click on ?Go?. Remember when creating a database that the database name must start with your user name: username_dbname.
Backup copies
a) Exporting. Backup copies can be performed from the local computer or remotely via the Internet. Open phpMyAdmin on a web browser. If the database is hosted at your local computer, type http://localhost/phpmyadmin in your browser. Alternatively, if the database is hosted on another computer, type the URL of your domain in your browser. Select the database to be exported in the left drop-down menu of databases and click on ?Export? Then, check the option ?Save as file? and click on ?Go?. It is strongly recommended that you create backup copies regularly to avoid losing your data.
b) Importing. Backup copies of your database in SQL format can be imported onto the DBMS. First, open phpMyAdmin. If the database already exists, drop the database and create it again. Once the database is created, click on ?Import?. A file selection dialog will open. Select the backup SQL file on your computer and accept.
GyDB Package file structure overview
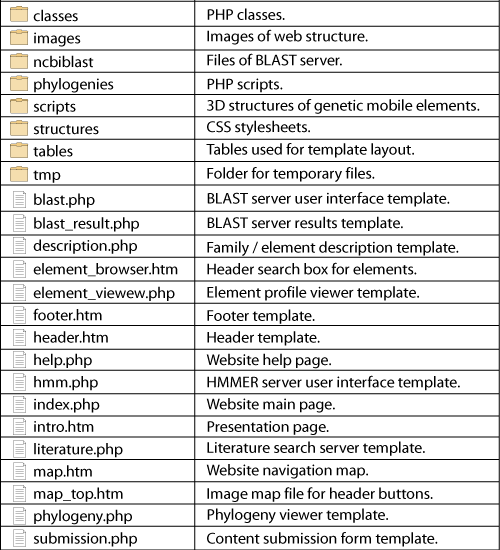
Almost all pages are dynamically generated with PHP templates. This means that one template exists for each section of the database that retrieves its contents from the DBMS, depending on the user?s request, which is coded by the GET method (URL 4) and received in the URL by the web server. For example, if a user wants to see a phylogeny named ?tree1? in the phylogeny viewer template, the server receives the following URL: ?localhost/gydb/phylogeny.php?tree=tree1?. The template called ?phylogeny.php? asks the DBMS for a tree named ?tree1?. When the DMBS finds the record of tree1 in the tree database, it returns this information to be displayed in the phylogeny template, which defines its layout and presentation. The file structure of the GyDB Package is shown in Figure 4.
Domain/Family descriptions
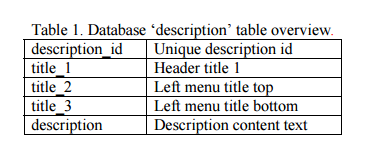
a) Add a database entry. Open phpMyAdmin, select the ?gydb_gydb? database, and, select the ?description? table. Click on ?Insert? and fill in all fields. The field ?description? must contain the full description text in HTML format. To show images, use the <img> tag. See the ?description? table overview in Table 1.
b) Insert images in the description folder. All images used in the text of the description must be saved in the folder ?images/descriptions?.
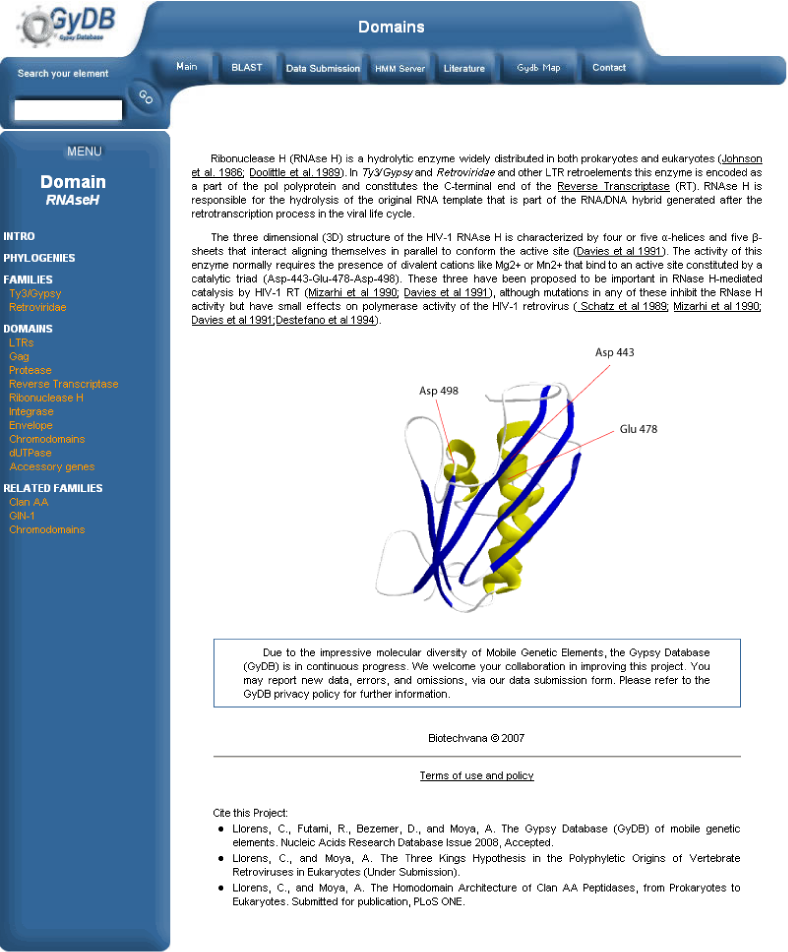
c) Link to this description. Add a link to this description in the navigation menu like this: '<a href="description.php?desc=mydescription">mydescription</a>?. See the ?description? template screenshot in Figure 5.
Element descriptions
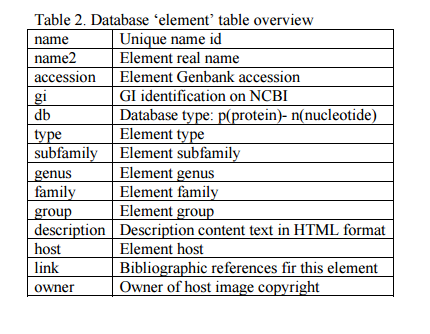
a) Add a database record. Open phpMyAdmin, select the ?gydb_gydb? database, and, select the ?element? table. Click on ?Insert? and fill in all fields. See the ?element? table overview in Table 2.
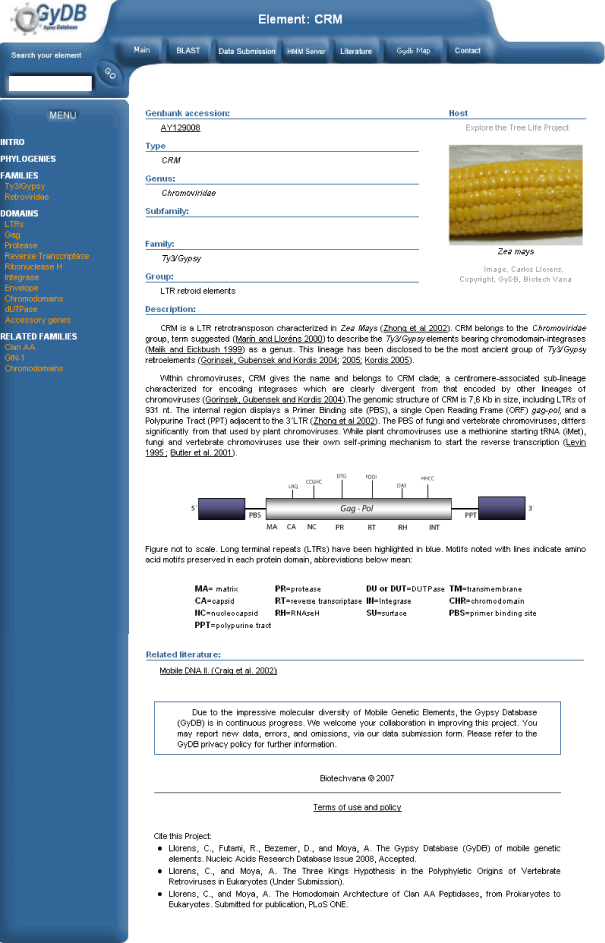
b) Insert host images in the elements folder. All images used in the text of the description must be saved in the folder ?images/host?. See the ?element? template screenshot in Figure 6.
c) Insert structure images in the structures folder. All images used in the text of the description must be saved in the folder ?images/structures?.
d) Link to this description. Add a link to this description in the navigation menu, like this: ?<a href=?element_viewer.php?element=myelement?>myelement</a>?.
e) Notes. For inserting several Genebank accessions in an element description, separate different accession codes using the sign ?#?, for example, ?234234#23422#4553?. Link: each link to a bibliographical reference must be written in separated lines following this format: ?literature_id#text_to_show? (The ID must be present in the ?literature? table).
Section Phylogenies
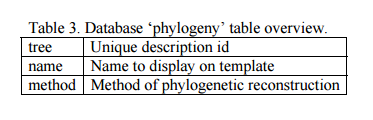
a) Add a database record. Open phpMyAdmin, select the ?gydb_gydb? database, and, select the ?phylogeny? table; click on ?Insert? and fill in all fields. See the ?phylogeny? table overview in Table 3.
b) Insert phylogeny images in the ?phylogenies? folder. Create an image in a suitable format for web publishing, such as JPG, GIF, or PNG. We recommend a width equal to or less than 450 pixels. All trees contained in the GyDB were created using Phylograph; a tree drawing application that allows you to create and manipulate phylogenetic trees (see the Section software in Biotechvana Bioinformatics).
c) Insert an HTML page in the ?phylogenies? folder; all images must be embedded within an HTML page named identically to that of its corresponding phylogeny image, using the tag ?<img>?. Optionally, an image map can be created to add a link to each element in the phylogeny. This can be easily done with Phylograph.
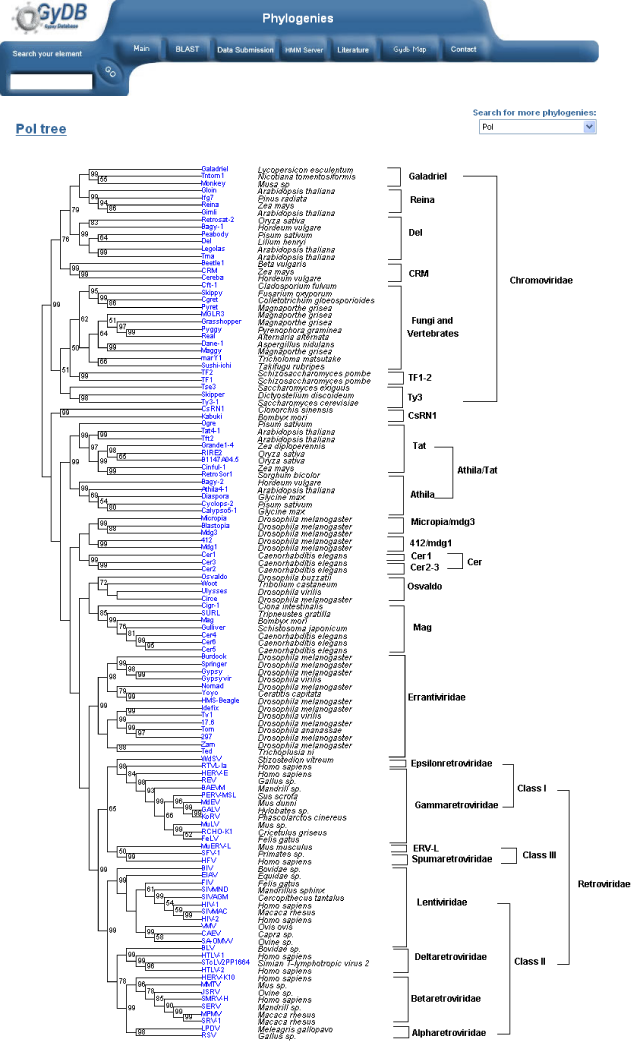
d) Link to this phylogeny. Add a link to this phylogeny in the navigation menu or in any description like this: ?<a href="phylogeny.php?tree=my_tree">my_tree</a>?. See the ?phylogeny? template screenshot in Figure 7.
Clan AA Meta-scenario
Phylogenetic relationships can be used to infer by maximum likelihood (ML) the most likely ancestral sequence from which a set of contemporary sequences evolve (4;5). ML is a statistical method that estimates the best way of fitting a mathematical model to some data. The method estimates the parameter θ by finding the value of θ that maximizes L (θ) which is the ML estimator (MLE) of θ. We have reconstructed a ML scenario of ancestry for clan AA of aspartic peptidases (6;7). This work is introduced in a forthcoming manuscript (in preparation) but in essence we basically used a collection of clan AA alignments available at the GyDB collection (see the Section Computational resources at Biotechvana Bioinformatics) as an input to perform a number of ancestral ML reconstructions with the tool FastML 2.02 (8).
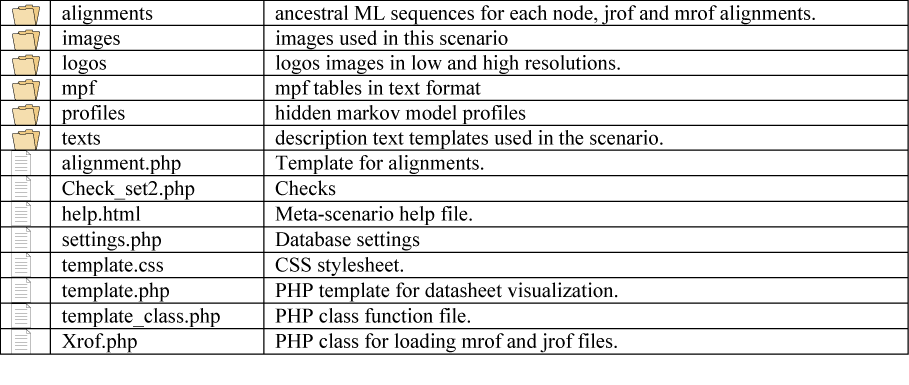
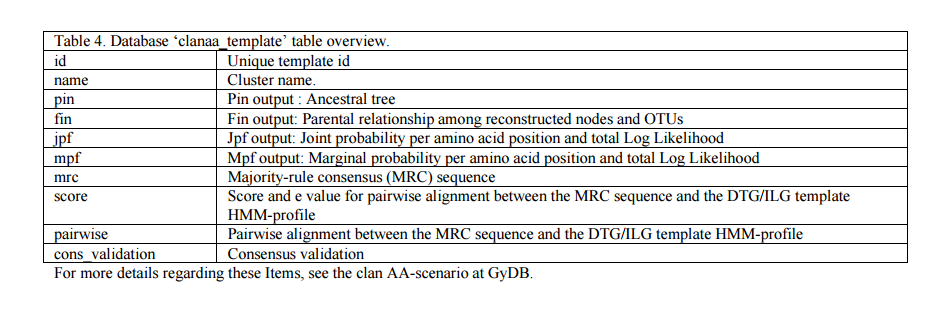
There are two methods of ancestral ML reconstruction, Joint and Marginal (4;5;8). Algorithms for marginal and joint maximum likelihood reconstructions are described in (5) and (8). FastML generates a NJ tree and returns six outputs; two of them (Jrof and Mrof) reconstruct all possible ML sequences based on that tree (each ML sequence represents a node between two contemporary sequences). The Jrof output returns a multiple alignment containing contemporary sequences and nodes reconstructed with the Joint method, Mrof returns the same based on the marginal method. We abstracted all the generated material within a section of the GyDB we call the clan AA Meta-scenario (URL 5). The meta-scenario contemplates 35 datasheets, one for each cluster we reconstructed plus an additional datasheet for an ancestral consensus we call DTG/ILG template. Each datasheet exhibits several options divided in categories according to ancestral ML reconstruction outputs, consensus sequences and statistical validation. Each cluster links to a PHP datasheet template named ?template.php? which is located at the folder named ?clanaa_scenario?. This PHP template retrieves the information from the ?clanaa_template? (see table 4) and files contained in the ?clanaa_scenario? folder (see figure 8) based in the arguments the URL receive by the GET method. For instance: template.php?id=caulimoviridae&format=htm&set_align=set1. Here, ?id? is the cluster unique identifier; ?format? selects one of the seven different formats available; and ?set_align? permits to choose between two different sets (set 1 ? set 2) for processed and not processed versions of each alignment. The Meta-scenario PHP-template is a dynamic map that recreates a phylogenetic tree inferred based on the alignment of all Jrof nodes reconstructed. The tree is stored in the ?phylogenies? folder as a standard phylogeny. A dynamic Flash file named ?clanaa_scenario.swf? is used instead a PNG static image to represent this tree. This flash file is accompanied with its corresponding HTML file named ?clanaa_scenario.html?.
Literature server
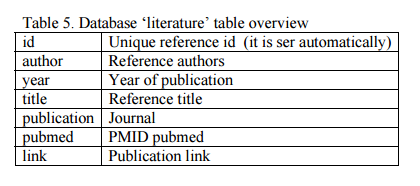
a) Add a database entry. Open phpMyAdmin, select the ?gydb_gydb? database, and, select the ?literature? table. Click on ?Insert? and fill in all fields. See the ?literature? table overview in Table 5.
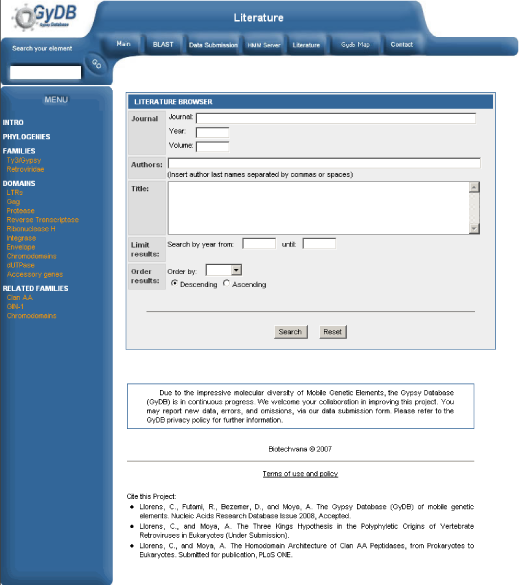
b) Link to this bibliographical reference. Now that we have the reference in our database, we must insert a link in each document to make it visible and available. First, we need its identification code (the ?id? field value in the database). Then edit any text from your database, such as a host description or a domain description, and insert a link like this: ?<a href=?bibliography.php?biblioId=id?>Authors 2007</a>?. See the ?literature? template screenshot in Figure 9.
Menu management
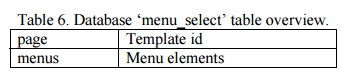
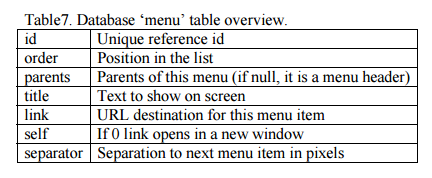
The menus in the left-hand frame are recorded in two tables on the database ?menu? and ?menu_select?. The ?menu? table contains all menu items and menu headers and their corresponding links. Each menu item has a unique ID text. Each menu set is made up of a menu parent (the header) and its menu children (its sections). If a menu item has its parent set to null, it is considered as a menu parent, the header of a menu set. Its children must thus have the parent field set to its corresponding menu parent?s ID. See the ?menu_select? table overview in Table 6. The ?menu? table, records the menu set corresponding to each template. Each record of this table contains the template name and the list of menu parents to load, separated by a ?#? character. Menu parents will load automatically the entire menu set by querying the ?menu_select? table. See the ?menu? table overview in Table 7.
Top navigation bar
The links corresponding to the top navigation bar are defined in an HTML image map file located at ?gydb/menu_top.htm?. Edit this file to change these links. In this file are located the links for the HMMER (URL 6) and BLAST (9) searches, which point to the GyDB servers. The ?contact? link can be modified editing this file to load an external contact form or simply link to an email address inserting a link like this:??.
Servers
The NCBI BLAST (Basic Local Alignment Search Tool) (9) is an implementation of the BLAST algorithm that includes blastp, blastn, blastx, and tblastn applications. BLAST is an algorithm used to compare protein and DNA sequences. A BLAST search enables a researcher to compare a query sequence with a library or database of sequences to identify homologues above a certain threshold. HMMER is an implementation of the profile HMM (hidden Markov model) method (10) to build statistical model profiles of consensuses derived from multiple alignment. This methodology can be used to search databases using HMM profiles as input queries to find close or distant homologues. The GyDB Package does not include these two applications by default, but the browser links corresponding to these servers directly link to the GyDB by default. This allows you to take advantage of these services without installing the servers. However, if you want to implement your own BLAST and HMMER searches and databases you have the option of installing and configuring them, as we explain here how to configure these services on GNU/Linux operating systems (we include all the scripts and templates required to run the servers). In any case, BLAST and HMMER servers can be installed on other platforms and operating systems such as Windows, Solaris, or Linux. A description follows;
a) BLAST. Get the latest distribution of BLAST at the NCBI?s FTP server (URL 7). Install it following its installation instructions. Once it is installed, create a symbolic link in the folder ?ncbiblast? pointing to the blast executable ?ln -s /usr/local/ncbi/bin/blast ./blast?. The scripts for executing BLAST service can be found in ?scripts/blast?. Protein or nucleotide source databases must be formatted to be searched with BLAST. To format these databases, use the formatdb application, included in the BLAST package. formatdb requires the databases to be in Fasta format. Formatted databases must be saved in the folder ?ncbiblast/db?. To show the user a list of available databases you must edit ?tables/blast.php?. We include a set of BLAST databases within the GyDB Package, but they can also be downloaded from the NCBI web site. BLAST databases can also be created with any file of FASTA-formatted protein or nucleotide sequences using the formatdb application provided with the NCBI BLAST package. Alternatively, BLAST databases can be downloaded from the NCBI web site (URL 8).
b) HMMER. Get the latest version of HMMER for your platform and operating system at (URL 6). We provide a database profile database located at ?gydb/scripts/HMMServer/database/profiles?. If you want to create your own profile database you must use the hmmbuild application included with the HMMER distribution. See the HMMER documentation for instructions on how to build HMM databases (the configuration file of this server is ?gydb/?scripts/HMMServer/hmm_procesar.php?). Edit this file to set your databases and executable locations.
c) Finally, edit the file ?gydb/map_top.htm? to set the correct URLs for BLAST and HMMER links.
Security
Here you have two simple advices to keep the security of your database:
a) Change the password of the ?gydb? and ?root? user in phpMyAdmin. It is important to change ?gydb? and ?root? user passwords to prevent unauthorized users from accessing your Database Management System. Open phpMyAdmin and click on ?Privileges? to display the list of DBMS users. Then click on the ?edit? icon of that user to edit it. Fill in the ?Change Password? section with the new password and accept.
b) Edit the settings configuration file of the GyDB Package. The configuration file for database access is located at ?gydb/scripts/settings.php?. Set the ?DB_PASS? key value to the password you entered in phpMyAdmin.
Images
All the images available or that you can implement in the database should be stored in a folder called ?images?. Note however that replacing the images already available will automatically affect all templates on the web site. To avoid this you can important to retain the original image sizes to preserve the layout integrity of the templates. The host images of the ?element_viewer? template (the web site describing each LTR retroelement species) are located in a folder named ?host? inside the ?images? folder. Here, we provide only the images of hosts, of which we are copyright owners. You can retrieve your own images and implement each LTR retroelement file, adding your own images to the ?host? folder.
Cascading Style Sheets
Cascading Style Sheets (CSS) is a stylesheet language used to describe the presentation of a document written in a markup language such as HTML. CSS is used to define colors, fonts, layout and other aspects of document presentation. It is designed primarily to enable the separation of document content (written in HTML or a similar markup language) from document presentation (written in CSS). By modifying a single file, the layout (fonts, colors, margins, sizes) of an entire web site can be changed automatically. The stylesheet of the GyDB Package is a file named ?stylesheet? that can be found in a folder named ?styles?. Modifying this file is recommended for advanced web designers only. To know more about CSS visit URL 9.
Temporary files
All temporary files are saved in the folder named ?tmp?. This folder and its subfolders must be configured with the appropriate permission, to be written by the Web server. We recommend setting permission recursively to all its subfolders. In GNU/Linux operating systems the syntax would be ?chmod 777 tmp -R?. An incorrect permission configuration of this folder can cause HMMER and BLAST failure, as they need to create temporary files in this folder in order to manage query results.
Installation
a) Installing Apache, PHP and MySQL. First, confirm that a web server engine, a PHP application server, and a DBMS are properly installed on your system. You can download and install a web server like Apache (URL 10) for Windows and Linux platforms; or an IIS (Internet Information Services) web server for Windows platforms, which comes included in Windows server versions. Next, install the PHP server, which can be downloaded at (URL 11); instructions are provided on its corresponding web site. Finally, install the MySQL DBMS. Once you have properly installed a web server engine, the PHP application server, and a DBMS, and they are all working, proceed with the installation of BSE as described below.
b) Install phpMyAdmin. Unzip the phpMyAdmin package into your Web directory. A folder named ?phpMyAdmin_xxx.xxx.xx? will be created. Rename this folder with a more easily remembered name, such as ?phpmyadmin?. phpMyAdmin has a configuration file named ?config.inc.php?, which contains the database user name and password settings. Edit this file and set parameters as appropriate for your server configuration. More documentation on phpMyAdmin can be found at its web site. We provide a short guide in the Section ?Database management?.
c) Create the database user. Open phpMyAdmin and create a user named ?gydb.? See the Section ?Creating users?, and follow the instructions.
d) Create and import the database. Open phpMyAdmin and create a database named ?gydb_gydb?, as explained in the Section ?Database management? (b). Import to this database the backup file named ?gydb_gydb.sql? included in the zip file of the GyDB Package, as detailed in the Section ?Backup copies?.
e) Create a database named ?gydb_bibliography? and import into this database the backup file named ?gydb_bibliography.sql? included in the zip file of the GyDB Package, as detailed in the Section ?Backup copies?. This database contains the bibliographical references used by the literature browser and contains more than 90,000 non-redundant citations.
f) Edit settings files as detailed in the Section ?Security?.
g) Finally, install ?The GyDB Package?. Download and unzip the GyDB package; a folder named ?gydb? will be created. Place this folder in your Web server?s public folder. Now open a web browser and type the following URL: http://localhost/gydb/index.htm. You should see the main page of your GyDB web site.
Requirements
For installation of the GyDB Package, the following applications are required: a Web server engine, a PHP application server, a database management system (DBMS), and the phpMyAdmin database administration tool. A web server engine is a computer program responsible for accepting HTTP requests from the user?s web browsers and delivering HTML web pages, images, and other files. An application server is software that helps a web server to process web pages containing server-side scripts that cannot be processed by a regular web server engine. When a dynamic page is requested by a visitor?s browser, the web server calls the application server for processing of the scripts, prior to sending the page to the browser. A DBMS is computer software designed for the purpose of managing databases. It controls the organization, storage, management, and retrieval of data in a database. phpMyAdmin is a tool written in PHP intended to handle the administration of MySQL over the Internet. It provides a web Graphical User Interface for easy management of database administration using a web browser. On Windows platforms, it is recommended that the user install a WAMP (Windows + Apache + MySQL + PHP) package that automatically installs and configures Apache, MySQL, and PHP on a Windows operating system such as AppServer (URL 12) or WAMP (URL 13). Intermediate knowledge of HTML language is also required, principally in web forms management and the POST and GET methods and URL parameter codification.
Concluding Remarks
The GyDB project pursues the fascinating goal of analyzing the non-redundant diversity of mobile genetic elements in the context of the tree of life. We distribute the GyDB package of Web sites and MySQL databases to be run on PCs and intranets. We do impose limitations on either the use or modification of the source code in order to personalize the database or create your own database. This means tat we allow you to create your own database, using the GyDB as a template, but we do not allow you to reproduce, redistribute, transmit, publish, and/or sell the own GyDB without our prior permission. We retain the perspective that the GyDB project may be itself transposable from one research group into another. If you are interested in this possibility, please see URL 14 and contact us. With this in mind we are working in how to implement the automations required to make this package a standalone tool coupled with the project online and capable to update and upgrade data from it. Until this improvement, we hope you to find this version useful.
Acknowledgments
We thank Rachel Epstein for language revision and the Servei Central de Suport a la Investigaci? Experimental (SCSIE) (URL 15) at UVEG for technical support. Biotechvana Bioinformatics has been awarded the NOVA 2006 by IMPIVA and Conselleria d`Empresa, Universitat I C?encia of Valencia. The research has been partly supported by grants IMCBTA/2005/45, IMIDTD/2006/158 and IMIDTD/2007/33 from IMPIVA, and by grant BFU2005-00503 from MEC to AM.
Literature
- 1. Llorens,C., Futami,R., Bezemer,D. and Moya,A. (2008) Nucleic Acids Research (NAR) 36 (Database-Issue):38-46
- 2. Eickbush,T.H. and Malik,H.S. (2002) In Craig,N.L., Craigie,R., Gellert,M. and Lambowitz,A.M. (eds.), Mobile DNA II. ASM Press, Washington DC., pp. 1111-1144.
- 3. Van Regenmortel,M.H.V., Fauquet,C.M., Bishop,D.H.L., Carstens,E.B., Estes,M.K., Lemon,S.M., Maniloff,J., Mayo,M.A., McGeoch,D.J., Pringle,C.R. et al. (2000) Virus Taxonomy: the classification and nomenclature of viruses. San Diego, California.
- 4. Yang,Z., Kumar,S. and Nei,M. (1995) Genetics, 141, 1641-1650.
- 5. Koshi,J.M. and Goldstein,R.A. (1996) J. Mol. Evol., 42, 313-320.
- 6. Rawlings,N.D. and Barrett,A.J. (1995). Methods Enzymol., 248, 105-120.
- 7. Rawlings,N.D., Tolle,D.P. and Barrett,A.J. (2004) Nucleic Acids Research, 32, D160-D164.
- 8. Pupko,T., Pe'er,I., Shamir,R. and Graur,D. (2000) Molecular Biology and Evolution, 17, 890-896.
- 9. Altschul,S.F., Madden,T.L., Schaffer,A.A., Zhang,J., Zhang,Z., Miller,W. and Lipman,D.J. (1997) Nucleic Acids Res., 25, 3389-3402.
- 10. Eddy,S.R. (1998) Bioinformatics, 14, 755-763.
URLs
- 1. COMMON PUBLIC LICENSE: http://www.opensource.org/licenses/cpl1.0.php
- 2.AGREEMENT: http://biotechvana.com/loader.php?section=contents&page=terms_ocl
- 3. phpMyAdmin Manual: http://http:phpmyadmin.net
- 4. GET method: http://www.w3.org
- 5. Clan AA meta-scenario: http://gydb.uv.es/gydb/phylogeny.php?tree=clanaa_scenario
- 6. HMMER: http://hmmer.janelia.org
- 7. NCBI?s FTP server: http://www.ncbi.nlm.nih.gov/Ftp
- 8. NCBI?s databases: ftp://ftp.ncbi.nih.gov/blast/db
- 9. CSS: http://www.w3.org/Style/CSS
- 10. Apache: http://www.apache.org
- 11. PHP server: http://php.net
- 12. AppServer: http://appservernetwork.com
- 13. WAMP: http://www.wampserver.com
- 14. PARTNERSHIP: http://biotechvana.com/loader.php?section=contents&page=terms_gydb
- 15. SCSIE, Universitat de Val?ncia: http://scsie.uv.es


